Have you ever wondered how to change pattern gauges so that a design created for one loom or machine may be worked in an entirely different gauge on a different loom or machine?
It's just arithmetic. You need to know how many stitches and rows per inch were expected in the original pattern and how many you are getting on your selected loom. For example, suppose a baby blanket is intended to be 22" square. If the original gauge was 2 stitches/" and yours is 5 stitches per inch, multiply the desired width of 22x5=110 pegs needed. If there's a particular repeat required, you may also have to decide to round up or down to get a complete repeat. For example, if the stitch pattern is a 4 stitch one, 110/4=27.5 That would leave you with a bump in the stitch pattern so you'd decide between 108 and 112 stitches because both of those allow for the stitch pattern to be completed. Do the same thing with the rows.
An alternate way to accomplish the same thing is to figure out the relationship between the 2 gauges and multiply the stitch and row counts using that information. Using the same example, 44 stitches were required on the bulky loom. Divide original gauge by new gauge: 2÷5=.40
.40 is the relationship. Divide the original peg count by the relationship:
44÷.4=110.
Perform whichever operation you find easier. It sounds like a lot when you read it but this is literally a 2 minute job for a blanket. For a garment with shaping, there are more measurements so it takes longer but it's still doable.
PS. if the pattern doesn't state stitches per inch, you can extrapolate it from other information. In our example, divide 44 pegs by the blanket width. 44÷2=2 stitches per inch.
FREE BABY BLANKET PATTERN FOR PRACTICE
I have done the arithmetic for you. But if your actual stitch gauge is a bit different, such as 4.4 stitches per inch, use the technique described above to perfect your numbers.
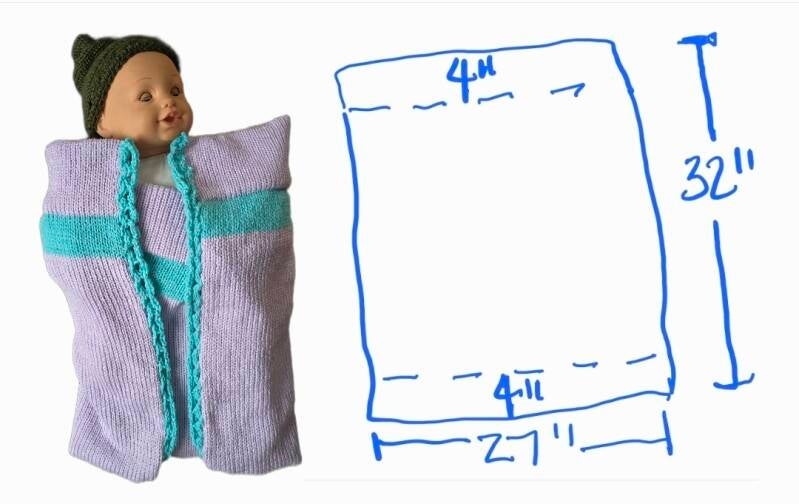
The pictured blanket is 27" wide by 32" long, excluding the double worm trim which is demonstrated in the video linked above. It's all stockinette. Loom knitters could use any form of the knit stitch. Each hung hem is 4" long.
It's a gift for a new baby in our neighborhood. You could match it on ANY loom or machine by multiplying 27 by your stitch gauge. If your gauge is 2[3, 4, 5, 6, 7, 8] per inch, you'll need 54[81, 108, 135, 162, 189, 216] stitches and if your row gauge is 3[4, 5, 6, 7, 8, 9, 10] per inch you'll need 96[128, 160, 192, 224, 256, 288, 320] rows. Those rows will create the front face of the blanket. In addition, you'll need 12[16, 20, 24, 28, 32, 36, 40] rows at each end for the turned under part of the hem. So after the cast on, knit the # of rows for the hem twice, then hang the cast on to close the hem. The first 12[16, 20, 24, 28, 32, 36, 40] rows of the blanket front are now complete so knit to the total row count, then knit another 12[16, 20, 24, 28, 32, 36, 40] rows for the underside of the final hem. You may fold these under and stitches them or use the technique shown in the video to close the second hem.
The turquoise stripes in the sample are the first and last 2" next to the hems. For me this was 12 rows.
Create Your Own Website With Webador